conductor_nr <- Conductor$
  new(tourName = "natural_resources",
    defaultStepOptions = list(
    cancelIcon = list(enabled = TRUE, NULL)
  ))$
  step(
    title = "Natural resources axis",
    text = htmltools::tags$iframe(src = "tour/natural_resources/tour1.html",
                                  width = "600px",  height = "460px",  style = "border:none;"),
    buttons = list(
      list(
        action = "next",
        text = "Next"
        )
      )
    )$
  step(
    el = ".panel_sliders",
    title = "Select aggregated preferences",
    text = htmltools::tags$iframe(src = "tour/natural_resources/tour2.html",
                                  width = "800px", height = "400px",  style = "border:none;"),
    )$
  step(
    el = "#map",
    title = "Time to explore",
    text = htmltools::tags$iframe(src = "tour/natural_resources/tour6.html",
                                  width = "470px",  height = "130px",  style = "border:none;"),
    position = "bottom-start"
    )$
  step(
    el = ".btn",
    title = "End of tour",
    text = htmltools::tags$iframe(src = "tour/natural_resources/tour7.html",
                                  width = "380px",  height = "80px",  style = "border:none;"),
    position = "top-start",
     buttons = list(
      list(
        action = "back",
        secondary = TRUE,
        text = "Previous"
        ),
      list(
        action = "next",
        text = "Finish"
        )
      )
)R Shiny interactive tours using Conductor
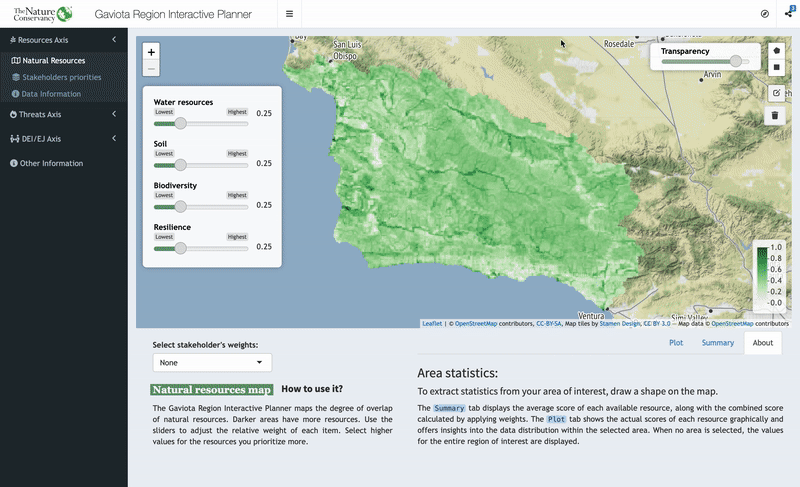
Check out the user-friendly guide I added to the Gaviota Coast Interactive Planner created for The Nature Conservancy. It is a great example if you are interested in implementing a guided tour in your own app.
Available options
When it comes to creating guided tours in R, there are several options available. One popular package is rintrojs, which incorporates Intro.js into Shiny. However, rintrojs has some limitations in terms of accessing the full range of features and customization options offered by Intro.js. Additionally, integrating the tour into existing RShiny code may not be as straightforward as with other alternatives, leading to a steeper learning curve.
An excellent alternative, widely used by many, is cicerone. This package offers a simpler and more intuitive syntax for defining tour steps and content. It compartmentalizes instructions, keeping them separate from the main code structure, which accelerates the tour creation process. However, from a personal perspective, the aesthetics and available customization options of cicerone may be less appealing.
That’s why, for my tour, I opted for conductor, a package that is based on cicerone’s structure but provides enhanced customization capabilities. Conductor utilizes shepherd.js, a JavaScript library designed to guide users through your app. This integration allows for greater customization in terms of visual display and appearance, making it a more attractive alternative.
More information about conductor here:
https://conductor.etiennebacher.com; https://github.com/etiennebacher/conductor
Using Conductor
Using conductor was a remarkably intuitive experience for me. If you’re already familiar with cicerone, transitioning to conductor should be relatively straightforward.
I structured the guided tour into three separate tours. The first one automatically displays when launching the app, while the other two can be initiated by clicking a button. To maintain code tidiness, I chose to create the conductor in the global.R file. However, it’s worth noting that you have the flexibility to place it anywhere within the app, including the ui or server parts.
Create a conductor
To design a tour with conductor, you start by creating a new instance using $new(), where you can include the options that will be preserved throughout the tour. Then, you add individual tour steps using $step(). These steps can be attached to specific elements of your app using the el parameter.
There are two main ways to select app elements in el. For specific app features like Shiny Widgets or outputs, you can specify the object id preceded by # (e.g., #map in the example below). Additionally, you can directly call elements from the rendered Shiny HTML by using the element’s class name preceded by .. This feature allows you to highlight not only functional app elements but also any element in the app for the tour. If you’re unsure about the class name of a specific element, you can access the HTML by launching the Shiny app and selecting “Inspect Element” by right-clicking on the element of interest.
If no el is specified, the popover will be displayed in the center of the screen. Here’s an example featuring four representative steps from my tour.
Another noteworthy feature of the conductor package is the ability to include text bodies from predefined HTML files, which contain the text and visualizations you want to display for each step. This feature proved particularly useful for me as it helped maintain a tidy code and app structure. I created separate HTML files for each step’s content and integrated them in the text parameter by using htmltools::tags$iframe().
Furthermore, similar to cicerone, conductor offers customization options for popup windows. You can define backward and forward buttons, set the position of the popover, its style, and more, allowing you to tailor the tour to your specific needs and preferences. This flexibility adds an extra layer of customization and enhances the overall user experience.
Call the conductor
Once the conductor has been defined, it’s time to initiate it. The process is straightforward. You simply need to include useConductor() in the ui section and use conductor$init()$start() anywhere within the server.
The example code below shows the conductor call in the server.R file. Following a modal dialog that introduces the app, the user can start the tour by clicking on the input$intro_tour button. Alternatively, they can choose to skip the tour by clicking on input$no_tour. Both options are handled using observeEvent. The final lines of code illustrate how to deploy different guided tours based on the page the user is on when invoking the tour by pressing the corresponding button.
observeEvent("", {
    showModal(modalDialog(
      htmltools::tags$iframe(src = "app_intro.html", width = '100%',
                             height = 570,  style = "border:none;"),
      easyClose = TRUE,
      footer = tagList(
        actionButton(inputId = "no_tour", label = "Skip tour", style = "align: center"),
        actionButton(inputId = "intro_tour", label = "Introduction Tour",
                     icon = icon("fa-regular fa-compass"))
      ), style = "margin-top:-45px;")
    )
  })

  observeEvent(input$intro_tour,{
      removeModal()
  })

  observeEvent(input$no_tour,{
    removeModal()
  })

  observeEvent(input$intro_tour ,{
      conductor_nr$init()$start()
  })

  observeEvent(input$invoke_tour ,{
    if (input$main_menu == "natural_resources_map"){
      conductor_nr$init()$start()
    } else if (input$main_menu == "environmental_stake_map"){
      conductor_s$init()$start()
    } else if (input$main_menu == "environmental_threats_map"){
    conductor_t$init()$start()
    } else if (input$main_menu == "equity_issues_map"){
    conductor_d$init()$start()
    }
  })
GitHub repository
Now that you’re familiar with the basics of using conductor, you can explore how it’s implemented in a fully deployed Shiny app.
To see how the conductor tour looks in action, you can visit the following link:
https://shinyapps.bren.ucsb.edu/TNC-Gaviota_Region_Interactive_Planner
If you’re interested in delving into the code and seeing how conductor is created and integrated into the app’s architecture, you can check out the GitHub repository at:
https://github.com/pcarbomestre/TNC-Gaviota_Region_Interactive_Planner
Feel free to explore the app and the code to get a better understanding of how conductor is used in a practical setting. I encourage everyone to explore the app and provide feedback for future updates and improvements. If you have any questions about this Repo, find any bugs, or have any recommendations for improvements, please don’t hesitate to contact me.